How to Calculate Rafters in 2020
Prerequisite Skills:
- Ability to read a tape measure.
- Familiarity with using a Speed Square.

Tools:
There are several approaches to laying out rafters. I’ll cover the most efficient method I’ve found, which uses RedX Roof App and a layout square. The only other tools necessary for layout are a tape measure and a pencil.
Rafter Terms A common rafter has three basic parts you need to become familiar with:
- Plumb cut, typically called the ridge cut, at the top end of the rafter.
- Birds-mouth, which consists of two cuts — a horizontal seat cut and a vertical shoulder cut.
- Tail cut, which may be cut plumb or square, depending on how the eaves are detailed.
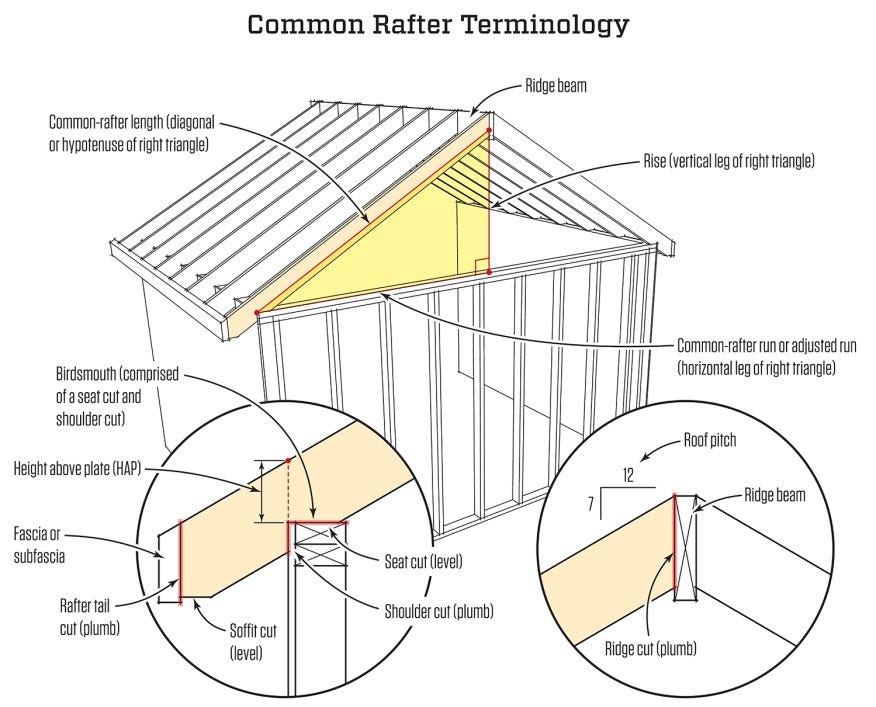
Rafter Layout To lay out a rafter, you need to know the roof slope and calculate the rafter run:
Roof slope is the incline of the roof, expressed as a ratio of the number of inches of rise (vertical travel) for every foot of run (horizontal travel). In our example, we have a 7:12 roof — 7 inches of rise for every foot of run. On construction calculators, slope is often called “pitch.”
Rafter run is the horizontal distance the rafter travels. On a full gable roof, this is equal to half the building width minus half the ridge thickness.
Calculating Rafter Length
The measurements needed to calculate the rafter length on the Redx Roof App is as follows.
- Roof pitch
- Run(adjusted run)
- Overhang(from inside of facia to wall)
Note that rafter length is measured from the tip of a plumb cut at the top end of the rafter (ridge cut) to the rafter tail cut (shown in the Section/Elevation below). Rafter length includes the rafter overhang.

Get the measurements
Now let’s enter our measurements in the app.
- Roof pitch
- Run(adjusted run)
- Overhang(from inside of facia to wall)
The app will generate an image of what the rafter will look like with all of the measurements needed to cut our rafter.
- Rafter total length
- Run (the adjusted run we entered)
- Rise (from top of wall)
- Birds-mouth depth
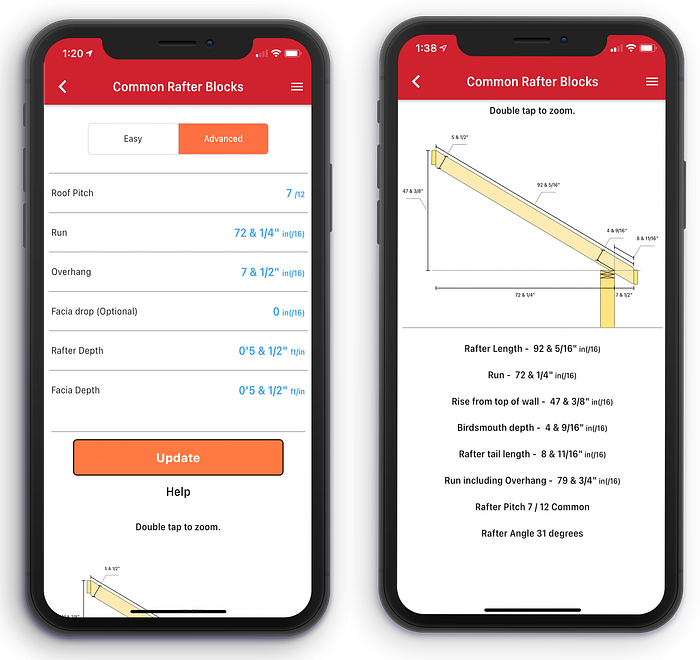
In the app you can zoom in on the rafter to get a closer look at the rafter and all of its measurements.
More fine tuning
You can also control how high or low you want your facia to be, by editing the Facia drop input field. If you want for facia to be higher you would enter a negative value, or a positive value if you want you facia to be lower.
In the examples below we will use 1" on the left and -4" on the right.
You can see how the app automatically updates all of the measurements for you.
Conclusion
If you know how to use a Speed Square and how to cut the rafter then you no longer need us!
If you want to find out more about the RedX Roof App click here.
Now let’s get back to work!
